Friday, March 3, 2017

Use Log4j With Maven, Java

Hello everibody, in this post we will use log4j for the porpuse of saving data of our application in a log.

1. We create a Maven Project, see the post How to create a maven quickstart project and a maven web project with Eclipse, Java

In this example we create a project called LogFourJ.

The structure of the project is as seen below


2. In the Pom.xml file include the dependency for log4j as seen below

 <project xmlns="http://maven.apache.org/POM/4.0.0" xmlns:xsi="http://www.w3.org/2001/XMLSchema-instance"  
  xsi:schemaLocation="http://maven.apache.org/POM/4.0.0 http://maven.apache.org/xsd/maven-4.0.0.xsd">  
  <modelVersion>4.0.0</modelVersion>  
  <groupId>com.co</groupId>  
  <artifactId>LogFourJ</artifactId>  
  <version>0.0.1-SNAPSHOT</version>  
  <packaging>jar</packaging>  
  <name>LogFourJ</name>  
  <url>http://maven.apache.org</url>  
  <properties>  
   <project.build.sourceEncoding>UTF-8</project.build.sourceEncoding>  
  </properties>  
  <dependencies>  
   <dependency>  
    <groupId>log4j</groupId>  
    <artifactId>log4j</artifactId>  
    <version>1.2.17</version>  
   </dependency>  
  </dependencies>  
 </project>  


3. Create an xml file called log4j.xml, this xml file must contain the next code

 <?xml version="1.0" encoding="UTF-8" ?>  
 <!DOCTYPE log4j:configuration SYSTEM "log4j.dtd">  
 <log4j:configuration debug="true"  
  xmlns:log4j='http://jakarta.apache.org/log4j/'>  
  <appender name="file" class="org.apache.log4j.RollingFileAppender">  
   <param name="append" value="false" />  
   <param name="maxFileSize" value="10KB" />  
   <param name="maxBackupIndex" value="5" />  
   <!-- For Tomcat -->   
   <param name="file" value="C:\\log4j.log" />  
   <layout class="org.apache.log4j.PatternLayout">  
  <param name="ConversionPattern"  
   value="%d{yyyy-MM-dd HH:mm:ss} %-5p %c{1}:%L - %m%n" />  
   </layout>  
  </appender>  
  <root>  
  <level value="ERROR" />  
  <appender-ref ref="file" />  
  </root>  
 </log4j:configuration>  

In this example we'll save the log in the C path, its name is log4j.log, As we can see below:

 <param name="file" value="C:\\log4j.log" />  

If we use some webserver like tomcat the path can be this:

 <param name="file" value="${catalina.home}/logs/myStruts1App.log" />  

You can tell it if the log will be overwrite or not overwrite, if the value is true the log will be overwrite and if the values is false the log will be not overwrite.

 <param name="append" value="true" />  

Yo can tell it the max file size too, if the file reached the maximum size the system create a copy and clean the log file and it start write since of first line.

 <param name="maxFileSize" value="10KB" />  

 The values can be KB, MB, GB, etc.

Here an explain of the sintaxis:

1. %d{yyyy-MM-dd HH:mm:ss} = Date and time format, refer to SimpleDateFormat JavaDoc.
2. %-5p = The logging priority, like DEBUG or ERROR. The -5 is optional, for the pretty print format.
3. %c{1} = The logging name we set via getLogger(), refer to log4j PatternLayout guide.
4. %L = The line number from where the logging request.
5. %m%n = The message to log and line break.
Reference:

Finally We'll do a test in the app class

 package com.co.LogFourJ;  
 import org.apache.log4j.Logger;  
 public class App   
 {  
      final static Logger logger = Logger.getLogger(App.class);  
   public static void main( String[] args )  
   {      
     logger.error("Ths is an error!!!");  
   }  
 }  

Now you can check the log4j.log file located in the C folder.

References:
https://www.mkyong.com/logging/log4j-hello-world-example/
https://www.mkyong.com/logging/log4j-xml-example/

How to create a maven quickstart project and a maven web project with Eclipse, Java

Hello everyone, in this post I'll show you how to create a maven quickstart project and a maven web project using Eclipse.

First we start with Maven quickstart project

1. Open Eclipse
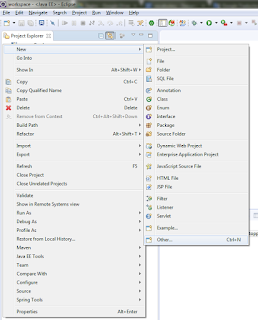
2. Click on File -> New -> Other...


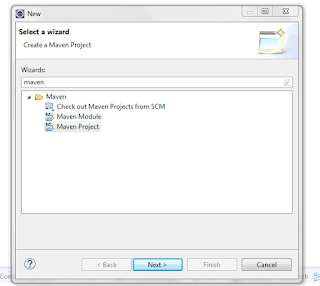
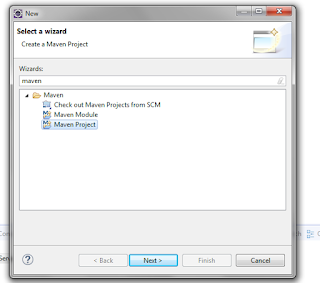
3. Select Maven Project


4. Next

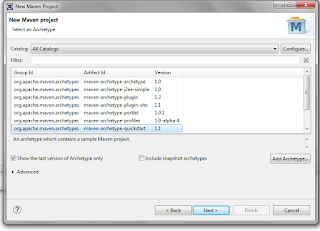
5. Select quickstart


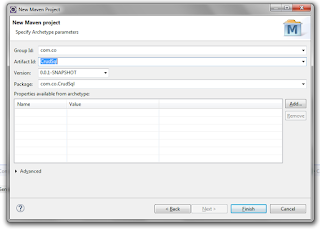
6. Write the name of your project


7. Finally this is the structure of your Maven project, it is very easy


Now we continue with a Maven web project

Repeat the steps from 1 to 4, later

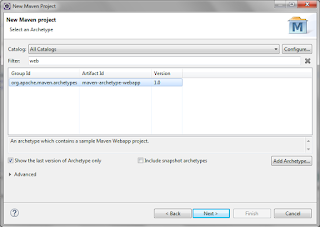
5.  Select Maven webapp

Repeat the 6 step, later

7. This is the structure of Maven web project


8. Add to pom.xml the javax.servlet dependencies as seen below

 <project xmlns="http://maven.apache.org/POM/4.0.0" xmlns:xsi="http://www.w3.org/2001/XMLSchema-instance"  
  xsi:schemaLocation="http://maven.apache.org/POM/4.0.0 http://maven.apache.org/maven-v4_0_0.xsd">  
  <modelVersion>4.0.0</modelVersion>  
  <groupId>com.co</groupId>  
  <artifactId>myPorject</artifactId>  
  <packaging>war</packaging>  
  <version>0.0.1-SNAPSHOT</version>  
  <name>myPorject Maven Webapp</name>  
  <url>http://maven.apache.org</url>  
  <dependencies>  
   <dependency>  
    <groupId>junit</groupId>  
    <artifactId>junit</artifactId>  
    <version>3.8.1</version>  
    <scope>test</scope>  
   </dependency>  
   <dependency>  
      <groupId>javax.servlet</groupId>  
      <artifactId>javax.servlet-api</artifactId>  
      <version>3.1.0</version>  
    </dependency>  
    <dependency>  
      <groupId>javax.servlet</groupId>  
      <artifactId>jstl</artifactId>  
      <version>1.2</version>  
    </dependency>  
  </dependencies>  
  <build>  
   <finalName>myPorject</finalName>  
  </build>  
 </project>  

9. Then right click on project and select properties, select java build path, and delete the packages that have been forgotten.

10. Right click on project and select properties, click on Add folder select main path, click on create new folder and call it java


11. Finally this is the structure of your Maven web project.


Friday, February 17, 2017

Create a barcode Using Javascript Jquery

Hello, if you want to create a barcode using javascript you can do it as follows.

You can download the js file from this link, latter you can create a function for use the barcode.

In html we create the next div and the next button

 <div id="barcode"></div>  
 <button type="button" id="brnBarCode" onclick="load();">Barcode</button>  

Remember include the script downloaded jquery-barcode.min.js and the jquery script in the html file, for example:

 <script src="https://ajax.googleapis.com/ajax/libs/jquery/1.12.2/jquery.min.js"></script>  
 <script src="<%=request.getContextPath()%>/static/js/jquery-barcode.min.js"></script>  


In this example we create a function called load, this function invoke the barcode method

 load = function(){  
  $("#barcode").barcode(  
  $('#docId').val(), // Value barcode (dependent on the type of barcode)   
  "code39" // types supported   
  );  
 }  

The button calls the function load, this function will create the barcode that it will be displayed in the div with id = barcode.


 Barcode types supported:  
 EAN 8  
 EAN 13  
 UPC  
 standard 2 of 5 (industrial)  
 interleaved 2 of 5  
 code 11  
 code 39  
 code 93  
 code 128  
 codabar  
 MSI  
 Data Matrix  

Reference: link

javascript print all page or print a page section

Hello everybody.

If we print all page using javascript we can use the next code:

 window.print();  

For example, we create the next Html code with a respective javascript.

 <!DOCTYPE html>  
 <html>  
 <body>  
 <p>print this</p>  
 <button onclick="printAll()">Print Page</button>  
 <script>  
 printAll = function(){  
   window.print();  
 }  
 </script>  
 </body>  
 </html>  

When we click on the button, the page can be print.

Now we want print a page section with javascript, we can use the next code:

 print = function(area){  
  var ficha=document.getElementById(area);  
  var ventimp=window.open(' ','popimpr');  
  ventimp.document.write(ficha.innerHTML);  
  ventimp.document.close();  
  ventimp.print();  
  ventimp.close();  
 }  

Here there is an example:

 <!DOCTYPE html>  
 <html>  
 <body>  
 <div id="area"><p>print this</p></div>  
 <p>No print this</p>  
 <button onclick="print('area')">Print Page</button>  
 <script>  
 print = function(area){  
  var ficha=document.getElementById(area);  
  var ventimp=window.open(' ','popimpr');  
  ventimp.document.write(ficha.innerHTML);  
  ventimp.document.close();  
  ventimp.print();  
  ventimp.close();  
 }  
 </script>  
 </body>  
 </html>  


When we click on button, we can print only the content of the div with id = area

Tuesday, February 14, 2017

Create a RestFul Service In java Wit Maven, Spring and Jax-Rs

Hello everybody, if we want create a rest service using Maven we can follow the next steps:

1. We'll create a maven web project, in this example we'll name it RestMaven.


2. We edit the pom.xml file as follows

 <project xmlns="http://maven.apache.org/POM/4.0.0" xmlns:xsi="http://www.w3.org/2001/XMLSchema-instance"   
  xsi:schemaLocation="http://maven.apache.org/POM/4.0.0 http://maven.apache.org/maven-v4_0_0.xsd">   
  <modelVersion>4.0.0</modelVersion>   
  <groupId>com.co</groupId>   
  <artifactId>RestMaven</artifactId>   
  <packaging>war</packaging>   
  <version>0.0.1-SNAPSHOT</version>   
  <name>RestMaven Maven Webapp</name>   
  <url>http://maven.apache.org</url>   
  <dependencies>   
   <dependency>   
     <groupId>junit</groupId>   
     <artifactId>junit</artifactId>   
     <version>3.8.1</version>   
     <scope>test</scope>   
    </dependency>   
    <dependency>   
     <groupId>javax.servlet</groupId>   
     <artifactId>javax.servlet-api</artifactId>   
     <version>3.1.0</version>   
    </dependency>   
    <dependency>   
     <groupId>javax.servlet</groupId>   
     <artifactId>jstl</artifactId>   
     <version>1.2</version>   
    </dependency>     
    <dependency>   
      <groupId>com.sun.jersey</groupId>   
      <artifactId>jersey-server</artifactId>   
      <version>1.9</version>   
   </dependency>   
  </dependencies>   
  <build>   
   <finalName>RestMaven</finalName>   
  </build>   
  </project>   


3. Right click on project, select Properties -> Java Build Path and latter we remove the following directories:


4. In the same window we create a java folder as we can see in the next picture

5. Right click on project -> Properties -> Project Facets and we mark JAX-RS option as follows


6. Now we create a package in Java folder that we created in the 4 step.

com.co.RestServices.controller.controller

This package you can name it when you want.

7. We edit the web.xml file as follows

 <?xml version="1.0" encoding="UTF-8"?>   
  <web-app xmlns:xsi="http://www.w3.org/2001/XMLSchema-instance"   
    xmlns="http://xmlns.jcp.org/xml/ns/javaee"   
    xsi:schemaLocation="http://xmlns.jcp.org/xml/ns/javaee http://xmlns.jcp.org/xml/ns/javaee/web-app_3_1.xsd"   
    id="WebApp_ID" version="3.1">   
  <display-name>Archetype Created Web Application</display-name>   
  <welcome-file-list>   
       <welcome-file>index.html</welcome-file>   
       <welcome-file>index.htm</welcome-file>   
       <welcome-file>index.jsp</welcome-file>   
       <welcome-file>default.html</welcome-file>   
       <welcome-file>default.htm</welcome-file>   
       <welcome-file>default.jsp</welcome-file>   
    </welcome-file-list>   
    <servlet>   
       <servlet-name>RestMaven</servlet-name>   
       <servlet-class>com.sun.jersey.spi.container.servlet.ServletContainer</servlet-class>   
       <init-param>   
         <param-name>com.sun.jersey.config.property.packages</param-name>   
         <param-value>com.co.RestServices.controller.controller</param-value>   
       </init-param>   
       <load-on-startup>1</load-on-startup>   
    </servlet>   
    <servlet-mapping>   
       <servlet-name>RestMaven</servlet-name>   
       <url-pattern>/rest/*</url-pattern>   
    </servlet-mapping>   
  </web-app>   


8. We create a Class for management the rest service, in this example we'll calle it RestMain

 package com.co.RestServices.controller.controller;  
 import javax.ws.rs.FormParam;  
 import javax.ws.rs.POST;  
 import javax.ws.rs.Path;  
 import javax.ws.rs.Produces;  
 import javax.ws.rs.core.MediaType;  
 import javax.ws.rs.core.Response;  
 @Path("/")   
 public class RestMain {  
      @POST   
      @Path("/postMain")   
      @Produces(MediaType.APPLICATION_JSON)   
   public Response postMain(@FormParam("value") String value) {   
      String response = "{'Message': '"+value+"'}";        
      return Response.ok(response, MediaType.APPLICATION_JSON).build();      
   }   
 }  


9. Now we can try the rest service, in this example we use Google Advanced REST client.


Thursday, February 9, 2017

Java, How to convert Calendar to String?, How to convert String to Calendar? and How to compare days, weeks and years with calendar?

Hello everybody, in this post I will show you how you can convert calendar to string, string to calendar and how you can compare days, weeks and years using java calendar library.

This is the code:


 import java.text.ParseException;   
 import java.text.SimpleDateFormat;   
 import java.util.Calendar;   
 public class DatesUtilities{   
    private Calendar dateTimeNow = null;   
    private SimpleDateFormat sdf = null;   
    public DatesUtilities(){   
       dateTimeNow = Calendar.getInstance();   
       sdf = new SimpleDateFormat("yyyy-MM-dd hh:mm:ss");   
    }   
    /*This method compare two dates, by the days, months and the years*/   
    public boolean equalsDates(Calendar firstDate, Calendar secondDate) throws Exception {   
       if(firstDate.get(Calendar.DAY_OF_MONTH) != secondDate.get(Calendar.DAY_OF_MONTH)){   
         return false;   
       }   
       if(firstDate.get(Calendar.MONTH) != secondDate.get(Calendar.MONTH)){   
         return false;   
       }   
       if(firstDate.get(Calendar.YEAR) != secondDate.get(Calendar.YEAR)){   
         return false;   
       }   
       return true;   
    }   
    /*This method receive two dates for compare like the previews method, but one of them is a string*/   
    public boolean equalsDates(Calendar firstDate, String secondDate) throws Exception {   
       return equalsDates(firstDate, stringToCalendar(secondDate));   
    }   
    /*This method return a calendar date from a string date*/   
    public Calendar stringToCalendar(String date) throws ParseException{        
       Calendar calendarDate = Calendar.getInstance();   
       calendarDate.setTime(sdf.parse(date));        
       return calendarDate;        
    }   
     /*This method return a String from a calendar using SimpleDateFormat*/  
      public String calendarToString(Calendar date) throws Exception{  
           String stringDate = sdf.format(date.getTime());  
           return stringDate;  
      }  
    /*This method return a Calendar with the current date*/   
    public Calendar getDateTimeNow() {   
       return dateTimeNow;   
    }   
    /*This method return a string with the current date from a Calendar*/   
    public String getDateTimeNowString(){        
       return sdf.format(dateTimeNow.getTime());   
    }   
  }   


First we use SimpleDateFormat to tell the system how is the date format that we will use. In this example we'll use year-Month-day hour:minutes:seconds.

 sdf = new SimpleDateFormat("yyyy-MM-dd hh:mm:ss");  

We start the variable dateTimeNow with the current date:

 dateTimeNow = Calendar.getInstance();  


Now we use the method getDateTimeNow for return the current date:

 /*This method return a Calendar with the current date*/  
      public Calendar getDateTimeNow() {  
           return dateTimeNow;  
      }  


We use the getDateTimeNow method for return the current date like a String from calendar:

 /*This method return a string with the current date from a Calendar*/  
      public String getDateTimeNowString(){            
           return sdf.format(dateTimeNow.getTime());  
      }  
Look that we are using the SimpleDateFormat.format method.


We use the stringToCalendar method for convert a String type date into Calendar type:

 /*This method return a calendar date from a string date*/  
      public Calendar stringToCalendar(String date) throws ParseException{            
           Calendar calendarDate = Calendar.getInstance();  
           calendarDate.setTime(sdf.parse(date));            
           return calendarDate;            
      }  
Look that we are using the SimpleDateFormat.parse method.


We use the calendarToString method for convert a Calendar type into String type with a custom format:

 /*This method return a String from a calendar using SimpleDateFormat*/  
      public String calendarToString(Calendar date) throws Exception{  
           String stringDate = sdf.format(date.getTime());  
           return stringDate;  
      }  
Look that we are using the SimpleDateFormat.format method.


We use the equalsDate method for compare two dates, in this example we compare if the days, months and years are equals, the method returns false if any of them are not the same:

 /*This method compare two dates, by the days, months and the years*/  
      public boolean equalsDates(Calendar firstDate, Calendar secondDate) throws Exception {  
           if(firstDate.get(Calendar.DAY_OF_MONTH) != secondDate.get(Calendar.DAY_OF_MONTH)){  
                return false;  
           }  
           if(firstDate.get(Calendar.MONTH) != secondDate.get(Calendar.MONTH)){  
                return false;  
           }  
           if(firstDate.get(Calendar.YEAR) != secondDate.get(Calendar.YEAR)){  
                return false;  
           }  
           return true;  
      }  


And the "public boolean equalsDates(Calendar firstDate, String secondDate)" is an overloaded method that receive two variables, the first variable is a calendar type and the second variable is a String, this method use "stringToCalendar" method to convert the String type into Calendar type and latter it use the previous method to compare both days:

 /*This method receive two dates for compare like the previews method, but one of them is a string*/  
      public boolean equalsDates(Calendar firstDate, String secondDate) throws Exception {  
           return equalsDates(firstDate, stringToCalendar(secondDate));  
      }  


If you have any coment, you can write it down here:


Friday, February 3, 2017

How to create a Maven Project quick Start with Java, Hibernate, sqlite, sqlserver, mysql

Hello, in this post we will make a Maven project to create a CRUD with Sql Server, Mysql and Sqlite, we will use Hibernate and Java of course.

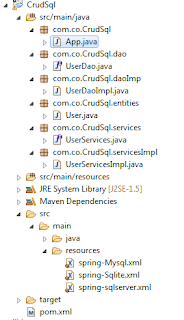
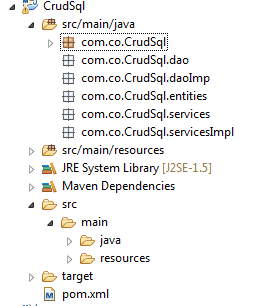
The Maven project that we will created we will call CrudSql, the final structure of this project will be


(For install the jdbc for Sql Server open here)


First we create the databases and tables in Sql server, Mysql and Sqlite

SqlServer:

 create database testDB;  
 use testDB;  
 CREATE TABLE Users(  
 id INT NOT NULL PRIMARY KEY IDENTITY(1,1),  
 name VARCHAR(30),  
 email VARCHAR(128)  
 );  

Mysql:

 create schema testDB;  
 use testDB;  
 CREATE TABLE Users(  
 id int not null auto_increment,  
 name varchar(30),  
 email VARCHAR(128),  
 PRIMARY KEY(id)  
 );  

Sqlite:
We create a file called testDB.sqlite and save it in D:\Spring\DB

Then we create the table

 CREATE TABLE Users (  
 id INTEGER PRIMARY KEY AUTOINCREMENT NOT NULL ,  
 name VARCHAR(30),  
 email VARCHAR(128)  
 );  


1. We create the project


2. We open the pom.xml File and we will edit it like this:

 <project xmlns="http://maven.apache.org/POM/4.0.0" xmlns:xsi="http://www.w3.org/2001/XMLSchema-instance"  
  xsi:schemaLocation="http://maven.apache.org/POM/4.0.0 http://maven.apache.org/xsd/maven-4.0.0.xsd">  
  <modelVersion>4.0.0</modelVersion>  
  <groupId>com.co</groupId>  
  <artifactId>CrudSql</artifactId>  
  <version>0.0.1-SNAPSHOT</version>  
  <packaging>jar</packaging>  
  <name>CrudSql</name>  
  <url>http://maven.apache.org</url>  
  <properties>  
       <java-version>1.7</java-version>  
       <project.build.sourceEncoding>UTF-8</project.build.sourceEncoding>  
      <project.reporting.outputEncoding>UTF-8</project.reporting.outputEncoding>  
      <!-- <hibernate.version>4.3.5.Final</hibernate.version> -->  
      <hibernate.version>4.3.5.Final</hibernate.version>  
      <!-- Logging -->  
      <logback.version>1.0.13</logback.version>  
      <slf4j.version>1.7.5</slf4j.version>       
  </properties>  
  <dependencies>  
     <!-- http://mvnrepository.com/artifact/org.springframework/spring-context-support -->  
     <dependency>  
       <groupId>org.springframework</groupId>  
       <artifactId>spring-context-support</artifactId>  
       <version>4.2.6.RELEASE</version>  
     </dependency>  
     <dependency>  
       <groupId>org.springframework</groupId>  
       <artifactId>spring-orm</artifactId>  
       <version>4.2.6.RELEASE</version>  
     </dependency>  
     <dependency>  
       <groupId>org.springframework</groupId>  
       <artifactId>spring-tx</artifactId>  
       <version>4.2.6.RELEASE</version>  
     </dependency>  
     <dependency>  
       <groupId>org.springframework</groupId>  
       <artifactId>spring-web</artifactId>  
       <version>4.2.6.RELEASE</version>  
     </dependency>  
     <dependency>  
       <groupId>commons-dbcp</groupId>  
       <artifactId>commons-dbcp</artifactId>  
       <version>1.4</version>  
     </dependency>      
     <dependency>  
       <groupId>org.hibernate</groupId>  
       <artifactId>hibernate-core</artifactId>  
       <version>4.1.0.Final</version>  
     </dependency>  
     <dependency>  
       <groupId>org.hibernate.javax.persistence</groupId>  
       <artifactId>hibernate-jpa-2.0-api</artifactId>  
       <version>1.0.0.Final</version>  
     </dependency>  
     <!-- https://mvnrepository.com/artifact/com.microsoft.sqlserver/sqljdbc4 -->   
            <dependency>   
             <groupId>com.microsoft.sqlserver</groupId>   
             <artifactId>sqljdbc4</artifactId>   
             <version>4.0</version>   
            </dependency>   
            <dependency>  
       <groupId>mysql</groupId>  
       <artifactId>mysql-connector-java</artifactId>  
       <version>5.1.36</version>  
     </dependency>  
     <!-- SQLite JDBC library -->  
           <dependency>  
       <groupId>org.xerial</groupId>  
       <artifactId>sqlite-jdbc</artifactId>  
       <version>3.7.2</version>  
     </dependency>      
           <dependency>  
             <groupId>net.kemitix</groupId>  
             <artifactId>sqlite-dialect</artifactId>  
             <version>0.1.0</version>  
           </dependency>  
           <!-- SQLite JDBC library Ends-->  
  </dependencies>  
 </project>  


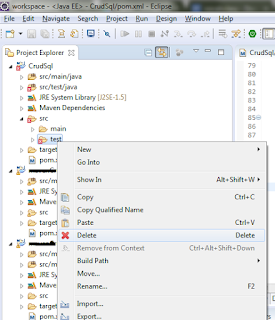
3. We delete the test folder


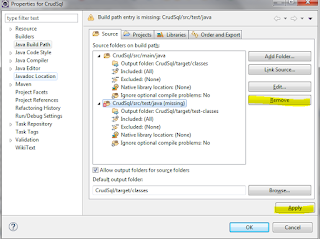
4. We press right click on project -> properties -> Java Build Path, we select the test project, we press the remove button and apply button


5. Now we create the structure of the project


6. First we create the entities.

 import javax.persistence.Table;  
 @Entity  
 @Table(name="Users")/*name of table*/  
 public class User {  
      @Id  
      @Column(name="id")/*name of column in the database*/  
      @GeneratedValue(strategy=GenerationType.IDENTITY)/*The id is autoincrement*/  
      private int id;       
      @Column(name="name")/*name of column in the database*/  
      private String name;  
      @Column(name="email")/*name of column in the database*/  
      private String email;  
      public int getId() {  
           return id;  
      }  
      public void setId(int id) {  
           this.id = id;  
      }  
      public String getName() {  
           return name;  
      }  
      public void setName(String name) {  
           this.name = name;  
      }  
      public String getEmail() {  
           return email;  
      }  
      public void setEmail(String email) {  
           this.email = email;  
      }  
 }  


7. Now we create the dao, we start with the interface and later we create the implement.

 package com.co.CrudSql.dao;  
 import com.co.CrudSql.entities.User;  
 public interface UserDao {  
      public void save(User user);  
      public void update(User user);  
      public void delete(User user);  
 }  


 package com.co.CrudSql.daoImp;  
 import org.hibernate.Session;  
 import org.hibernate.SessionFactory;  
 import org.hibernate.Transaction;  
 import com.co.CrudSql.dao.UserDao;  
 import com.co.CrudSql.entities.User;  
 public class UserDaoImpl implements UserDao{  
      private SessionFactory sessionFactory;  
      public void setSessionFactory(SessionFactory sessionFactory) {  
     this.sessionFactory = sessionFactory;  
   }  
      public void save(User user) {  
           Session session = this.sessionFactory.openSession();  
           Transaction tx = session.beginTransaction();  
           session.persist(user);  
           tx.commit();  
           session.close();            
      }  
      public void update(User user) {  
           Session session = this.sessionFactory.openSession();  
           Transaction tx = session.beginTransaction();  
           session.update(user);  
           tx.commit();  
           session.close();            
      }  
      public void delete(User user) {  
           Session session = this.sessionFactory.openSession();  
           Transaction tx = session.beginTransaction();  
           session.delete(user);  
           tx.commit();  
           session.close();            
      }  
 }  


8. We create the services interface and the services implement


 package com.co.CrudSql.services;  
 import com.co.CrudSql.entities.User;  
 public interface UserServices {  
      public void saveUser(User user) throws Exception;  
      public void updateUser(User user) throws Exception;  
      public void deleteUser(User user) throws Exception;
      public void closeContext() throws Exception;
 }  


In the constructor we can choose the database that we will use

 package com.co.CrudSql.servicesImpl;  
 import org.springframework.context.support.ClassPathXmlApplicationContext;  
 import com.co.CrudSql.dao.UserDao;  
 import com.co.CrudSql.entities.User;  
 import com.co.CrudSql.services.UserServices;  
 public class UserServicesImpl implements UserServices{  
      ClassPathXmlApplicationContext context;  
      UserDao userDao;  
      public UserServicesImpl(String tipoDb) {  
           super();  
           if("sqlServer".equalsIgnoreCase(tipoDb)){  
                this.context = new ClassPathXmlApplicationContext("spring-sqlserver.xml");  
           }  
           else if("sqlite".equalsIgnoreCase(tipoDb)){  
                this.context = new ClassPathXmlApplicationContext("spring-Sqlite.xml");  
           }  
           else if("mysql".equalsIgnoreCase(tipoDb)){  
                this.context = new ClassPathXmlApplicationContext("spring-Mysql.xml");  
           }  
           userDao = context.getBean(UserDao.class);  
      }       
      public void saveUser(User user) throws Exception {  
           this.userDao.save(user);  
      }  
      public void updateUser(User user) throws Exception {  
           this.userDao.update(user);  
      }  
      public void deleteUser(User user) throws Exception {  
           this.userDao.delete(user);  
      }  
      public void closeContext() throws Exception {
    context.close();  
 }
 }  


9. Now we create a folder called resources, then, we press again right click on project -> properties -> Java Build Path, we choose AddFolder and select the main folder -> click on Create New Folder -> write the name of folder, its name will be resources, we click in finish

In the resources folder we create a xml file that we'll call spring-sqlserver.xml, but you can call it with other name, in this file we'll write the database configuration

 <?xml version="1.0" encoding="UTF-8"?>  
 <beans xmlns="http://www.springframework.org/schema/beans"  
      xmlns:xsi="http://www.w3.org/2001/XMLSchema-instance" xmlns:aop="http://www.springframework.org/schema/aop"  
      xmlns:tx="http://www.springframework.org/schema/tx"  
      xsi:schemaLocation="http://www.springframework.org/schema/beans http://www.springframework.org/schema/beans/spring-beans.xsd  
           http://www.springframework.org/schema/aop http://www.springframework.org/schema/aop/spring-aop-4.0.xsd  
           http://www.springframework.org/schema/tx http://www.springframework.org/schema/tx/spring-tx-4.0.xsd">  
      <bean id="dataSource" class="org.apache.commons.dbcp.BasicDataSource"  
           destroy-method="close">  
           <property name="driverClassName" value="com.microsoft.sqlserver.jdbc.SQLServerDriver" />  
           <property name="url" value="jdbc:sqlserver://localhost:1433;databaseName=testDB" />  
           <property name="username" value="sa" />  
           <property name="password" value="MyPassword" />  
      </bean>  
      <!-- Hibernate 4 SessionFactory Bean definition -->  
      <bean id="hibernate4AnnotatedSessionFactory"  
           class="org.springframework.orm.hibernate4.LocalSessionFactoryBean">  
           <property name="dataSource" ref="dataSource" />  
           <property name="annotatedClasses">  
                <list>  
                     <value>com.co.CrudSql.entities.User</value>  
                     <!-- If we have more entities we can configurate here for example   
                     <value>com.co.CrudSql.entities.Country</value>  
                     <value>com.co.CrudSql.entities.Car</value>  
                     -->  
                </list>  
           </property>  
           <property name="hibernateProperties">  
                <props>  
                     <prop key="hibernate.dialect">org.hibernate.dialect.SQLServerDialect</prop>  
                     <prop key="hibernate.current_session_context_class">thread</prop>  
                     <prop key="hibernate.show_sql">false</prop>  
                </props>  
           </property>  
      </bean>  
      <bean id="UserDao" class="com.co.CrudSql.daoImp.UserDaoImpl">  
           <property name="sessionFactory" ref="hibernate4AnnotatedSessionFactory" />  
      </bean>  
      <!-- If we have more dao we can configurate here for example   
           <bean id="CountryDao" class="com.co.CrudSql.daoImp.CountryDaoIml">  
                <property name="sessionFactory" ref="hibernate4AnnotatedSessionFactory" />  
           </bean>  
           <bean id="CarDao" class="com.co.CrudSql.daoImp.CarDaoImpl">  
                <property name="sessionFactory" ref="hibernate4AnnotatedSessionFactory" />  
           </bean>  
      -->  
 </beans>  


We make the same with the others configurations for mysql and sqlite

spring-Mysql.xml:

 <?xml version="1.0" encoding="UTF-8"?>  
 <beans xmlns="http://www.springframework.org/schema/beans"  
      xmlns:xsi="http://www.w3.org/2001/XMLSchema-instance" xmlns:aop="http://www.springframework.org/schema/aop"  
      xmlns:tx="http://www.springframework.org/schema/tx"  
      xsi:schemaLocation="http://www.springframework.org/schema/beans http://www.springframework.org/schema/beans/spring-beans.xsd  
           http://www.springframework.org/schema/aop http://www.springframework.org/schema/aop/spring-aop-4.0.xsd  
           http://www.springframework.org/schema/tx http://www.springframework.org/schema/tx/spring-tx-4.0.xsd">  
      <bean id="dataSource" class="org.apache.commons.dbcp.BasicDataSource"  
           destroy-method="close">  
           <property name="driverClassName" value="com.mysql.jdbc.Driver" />  
           <property name="url" value="jdbc:mysql://localhost:3306/testDB" />  
           <property name="username" value="root" />  
           <property name="password" value="MyPassword" />  
      </bean>  
 <!-- Hibernate 4 SessionFactory Bean definition -->  
      <bean id="hibernate4AnnotatedSessionFactory"  
           class="org.springframework.orm.hibernate4.LocalSessionFactoryBean">  
           <property name="dataSource" ref="dataSource" />  
           <property name="annotatedClasses">  
                <list>  
                     <value>com.co.CrudSql.entities.User</value>  
                     <!-- If we have more entities we can configurate here for example   
                     <value>com.co.CrudSql.entities.Country</value>  
                     <value>com.co.CrudSql.entities.Car</value>  
                     -->  
                </list>  
           </property>  
           <property name="hibernateProperties">  
                <props>  
                     <prop key="hibernate.dialect">org.hibernate.dialect.MySQLDialect</prop>  
                     <prop key="hibernate.current_session_context_class">thread</prop>  
                     <prop key="hibernate.show_sql">false</prop>  
                </props>  
           </property>  
      </bean>  
      <bean id="UserDao" class="com.co.CrudSql.daoImp.UserDaoImpl">  
           <property name="sessionFactory" ref="hibernate4AnnotatedSessionFactory" />  
      </bean>  
      <!-- If we have more dao we can configurate here for example   
           <bean id="CountryDao" class="com.co.CrudSql.daoImp.CountryDaoIml">  
                <property name="sessionFactory" ref="hibernate4AnnotatedSessionFactory" />  
           </bean>  
           <bean id="CarDao" class="com.co.CrudSql.daoImp.CarDaoImpl">  
                <property name="sessionFactory" ref="hibernate4AnnotatedSessionFactory" />  
           </bean>  
      -->  
 </beans>  


spring-Sqlite.xml: i have the testDB.sqlite in D:\Spring\DB

 <?xml version="1.0" encoding="UTF-8"?>  
 <beans xmlns="http://www.springframework.org/schema/beans"  
      xmlns:xsi="http://www.w3.org/2001/XMLSchema-instance" xmlns:aop="http://www.springframework.org/schema/aop"  
      xmlns:tx="http://www.springframework.org/schema/tx"  
      xsi:schemaLocation="http://www.springframework.org/schema/beans http://www.springframework.org/schema/beans/spring-beans.xsd  
           http://www.springframework.org/schema/aop http://www.springframework.org/schema/aop/spring-aop-4.0.xsd  
           http://www.springframework.org/schema/tx http://www.springframework.org/schema/tx/spring-tx-4.0.xsd">  
      <bean id="dataSource" class="org.apache.commons.dbcp.BasicDataSource"  
           destroy-method="close">  
           <property name="driverClassName" value="org.sqlite.JDBC" />  
           <property name="url" value="jdbc:sqlite:D:\\Spring\\DB\\testDB.sqlite" />  
           <property name="username" value="" />  
           <property name="password" value="" />  
      </bean>  
 <!-- Hibernate 4 SessionFactory Bean definition -->  
      <bean id="hibernate4AnnotatedSessionFactory"  
           class="org.springframework.orm.hibernate4.LocalSessionFactoryBean">  
           <property name="dataSource" ref="dataSource" />  
           <property name="annotatedClasses">  
                <list>  
                     <value>com.co.CrudSql.entities.User</value>  
                     <!-- If we have more entities we can configurate here for example   
                     <value>com.co.CrudSql.entities.Country</value>  
                     <value>com.co.CrudSql.entities.Car</value>  
                     -->  
                </list>  
           </property>  
           <property name="hibernateProperties">  
                <props>  
                     <prop key="hibernate.dialect">org.hibernate.dialect.SQLiteDialect</prop>  
                     <prop key="hibernate.current_session_context_class">thread</prop>  
                     <prop key="hibernate.show_sql">false</prop>  
                </props>  
           </property>  
      </bean>  
      <bean id="UserDao" class="com.co.CrudSql.daoImp.UserDaoImpl">  
           <property name="sessionFactory" ref="hibernate4AnnotatedSessionFactory" />  
      </bean>  
      <!-- If we have more dao we can configurate here for example   
           <bean id="CountryDao" class="com.co.CrudSql.daoImp.CountryDaoIml">  
                <property name="sessionFactory" ref="hibernate4AnnotatedSessionFactory" />  
           </bean>  
           <bean id="CarDao" class="com.co.CrudSql.daoImp.CarDaoImpl">  
                <property name="sessionFactory" ref="hibernate4AnnotatedSessionFactory" />  
           </bean>  
      -->  
 </beans>  


10. Finally we create the code for save an user data in the main class, we could delete or update user here if we wish, only we must call the functions.

 package com.co.CrudSql;  
 import com.co.CrudSql.entities.User;  
 import com.co.CrudSql.services.UserServices;  
 import com.co.CrudSql.servicesImpl.UserServicesImpl;  
 public class App   
 {  
   public static void main( String[] args ) throws Exception  
   {  
     UserServices userServicesSqlServer = null;  
     UserServices userServicesMysql = null;  
     UserServices userServicesSqlite = null;  
        try {  
          User user = new User();

          userServicesSqlServer = new UserServicesImpl("sqlServer");             
          user.setName("My name");  
          user.setEmail("myname@myname.com");  
          userServicesSqlServer.saveUser(user);  
          
          userServicesMysql = new UserServicesImpl("mysql");  
          user = new User();  
          user.setName("My name");  
          user.setEmail("myname@myname.com");  
          userServicesMysql.saveUser(user);  

          userServicesSqlite = new UserServicesImpl("sqlite");  
          user = new User();  
          user.setName("My name");  
          user.setEmail("myname@myname.com");  
          userServicesSqlite.saveUser(user);  

           } catch (Exception e) {  
                e.printStackTrace();  
           }finally {                 
                userServicesSqlServer.closeContext();  
                userServicesMysql.closeContext();  
                userServicesSqlite.closeContext();  
           }  
   }  
 }  


How to install Apache Poi in Java using Maven (eclipse)

If we need to use apache poi in a Maven Project, we can follow the next simple steps.

We enter to the next link https://mvnrepository.com/artifact/org.apache.poi/poi there we can choose the version of Apache Poi that we prefer, in this example i will use the 3.5 version

We copy the dependency and we download the Jar, as we can see in the following figure
dependency of apache poi for Maven project Java

In this example i saved the Jar in the following directory : D:\Poi\poi-3.15.jar

Later we going to Eclipse, and we press right click on the project -> Run As -> Maven Build...

In the field Goals we put:

 install:install-file -Dfile="D:\jdbc\poi-3.15.jar" -DgroupId=org.apache.poi -DartifactId=poi -Dversion=3.15 -Dpackaging=jar  

Click on Apply And latter click on Run.

Finally we open the pom.xml File and we paste the dependency:

 <dependency>  
    <groupId>org.apache.poi</groupId>  
    <artifactId>poi</artifactId>  
    <version>3.15</version>  
 </dependency>  

Now we can use the apache poi library in our java project with Maven

Thursday, January 26, 2017

How to install the Sqljdbc4 for use Sql server with hibernate, spring, maven and eclipse

If we want to use sql server with a maven project that uses hibernate and spring we need the jdbc for sql server, but the maven has not integrate this jar, for this reason we have install it manually, for get it we can follow these steps.

First we must download the jar jdbc for sql server, we can download it from this link
https://mvnrepository.com/artifact/com.microsoft.sqlserver

In this example i have downloaded the Sqljdbc4 and i saved in the D:\jdbc\

Later Right click on the project, click on Run As ->Maven Build...

In the field goal you must put the code

 install:install-file -Dfile="D:\jdbc\sqljdbc4.jar" -DgroupId=com.microsoft.sqlserver -DartifactId=sqljdbc4 -Dversion=4.0 -Dpackaging=jar  


Click on Apply -> Click on Run

The next step is put in the pom.xml file the next code

 <!-- https://mvnrepository.com/artifact/com.microsoft.sqlserver/sqljdbc4 -->  
 <dependency>  
   <groupId>com.microsoft.sqlserver</groupId>  
   <artifactId>sqljdbc4</artifactId>  
   <version>4.0</version>  
 </dependency>  


With these steps you will have the jdbc for sql server ready in the maven project

Wednesday, January 25, 2017

Java Create a Barcode using BarCode4J And Maven

If we want to create a barcode we can use the Barcode4J library.


If we are using Maven the dependency that we can use is this:

 <!-- https://mvnrepository.com/artifact/net.sf.barcode4j/barcode4j -->  
 <dependency>  
   <groupId>net.sf.barcode4j</groupId>  
   <artifactId>barcode4j</artifactId>  
   <version>2.1</version>  
 </dependency>  
Ref: https://mvnrepository.com/artifact/net.sf.barcode4j/barcode4j/2.1


 If we are using Gradle the dependency that we can use is this:

 // https://mvnrepository.com/artifact/net.sf.barcode4j/barcode4j  
 compile group: 'net.sf.barcode4j', name: 'barcode4j', version: '2.1'  
Ref: https://mvnrepository.com/artifact/net.sf.barcode4j/barcode4j/2.1


The code in Java that we can use for create a barcode using Barcode4J is the next:

 import java.awt.image.BufferedImage;   
  import java.io.File;   
  import java.io.FileNotFoundException;   
  import java.io.FileOutputStream;   
  import java.io.OutputStream;   
  import org.krysalis.barcode4j.impl.code39.Code39Bean;   
  import org.krysalis.barcode4j.output.bitmap.BitmapCanvasProvider;   
  import org.krysalis.barcode4j.tools.UnitConv;   
  public class CodeBarServicesImpl implements CodeBarServices{   
    public void generateCodeBar(String codeBarValue) throws Exception {   
       String fullPath = null;   
       try {   
         Code39Bean bean = new Code39Bean();   
         final int dpi = 150;   
         String path = "D:\\";   
         String extension = ".jpg";   
         fullPath = path + codeBarValue + extension;   
         // Configure the barcode generator   
         bean.setModuleWidth(UnitConv.in2mm(1.0f / dpi)); // makes the narrow   
         bean.setWideFactor(3);   
         bean.doQuietZone(false);           
         File outputFile = new File(fullPath);   
         OutputStream out = new FileOutputStream(outputFile);   
         try {             
            BitmapCanvasProvider canvas = new BitmapCanvasProvider(out,   
            "image/jpeg", dpi, BufferedImage.TYPE_BYTE_BINARY,   
            false, 0);             
            // We Generate the barcode   
            bean.generateBarcode(canvas, codeBarValue);   
            canvas.finish();   
         } finally {   
            out.close();   
         }    
       } catch (Exception e) {           
         e.printStackTrace();   
         throw new Exception(e);   
       }    
    }      
  }