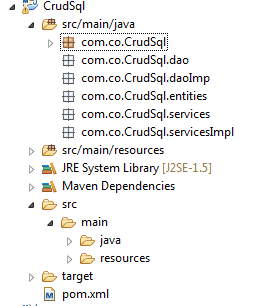
Hello, in this post we will make a Maven project to create a CRUD with Sql Server, Mysql and Sqlite, we will use Hibernate and Java of course.
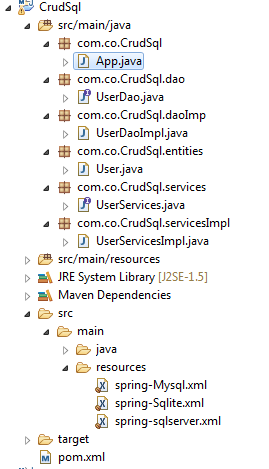
The Maven project that we will created we will call CrudSql, the final structure of this project will be
(For install the jdbc for Sql Server open
here)
First we create the databases and tables in Sql server, Mysql and Sqlite
SqlServer:
 create database testDB;
 use testDB;
 CREATE TABLE Users(
 id INT NOT NULL PRIMARY KEY IDENTITY(1,1),
 name VARCHAR(30),
 email VARCHAR(128)
 );
Mysql:
 create schema testDB;
 use testDB;
 CREATE TABLE Users(
 id int not null auto_increment,
 name varchar(30),
 email VARCHAR(128),
 PRIMARY KEY(id)
 );
Sqlite:
We create a file called testDB.sqlite and save it in D:\Spring\DB
Then we create the table
 CREATE TABLE Users (
 id INTEGER PRIMARY KEY AUTOINCREMENT NOT NULL ,
 name VARCHAR(30),
 email VARCHAR(128)
 );
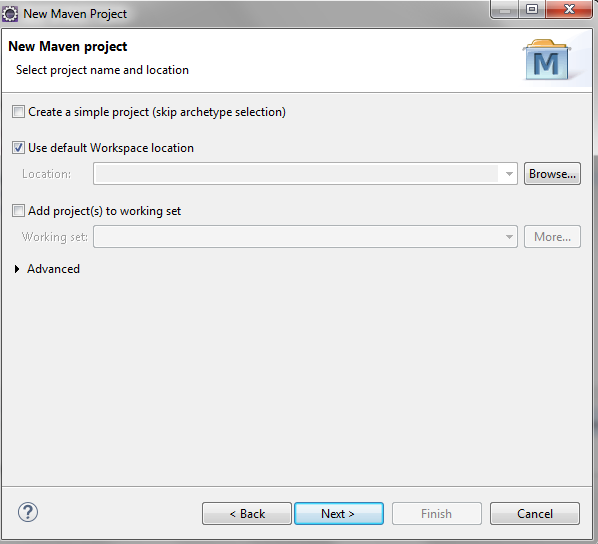
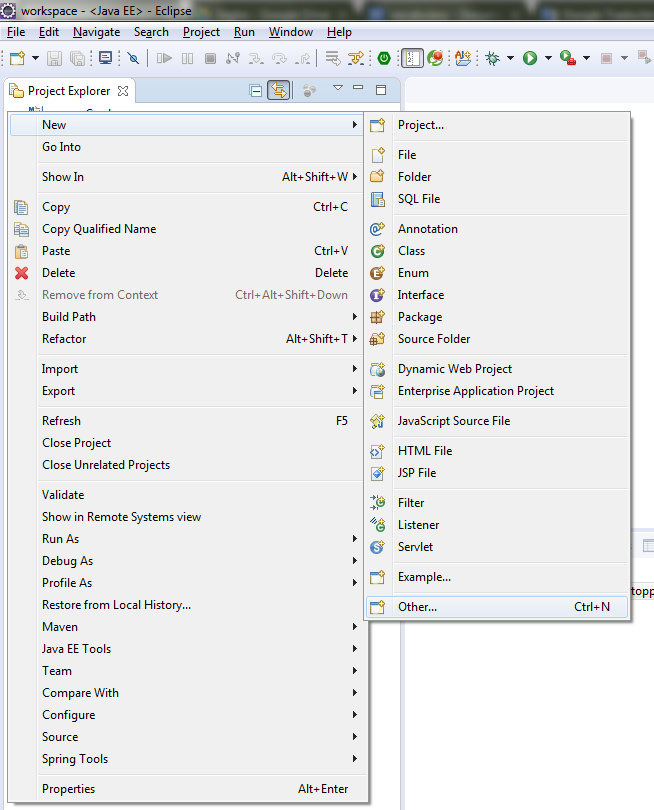
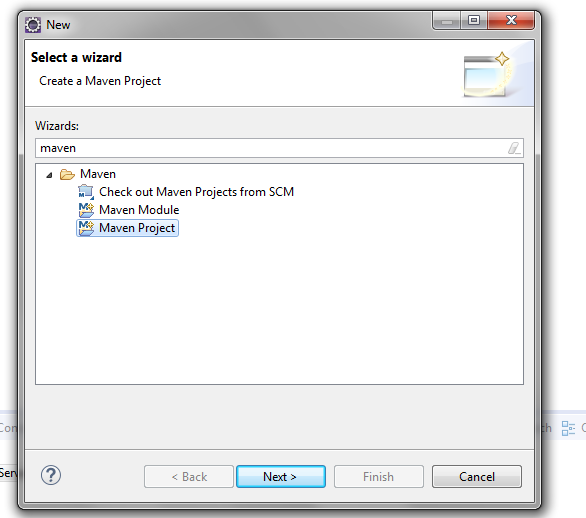
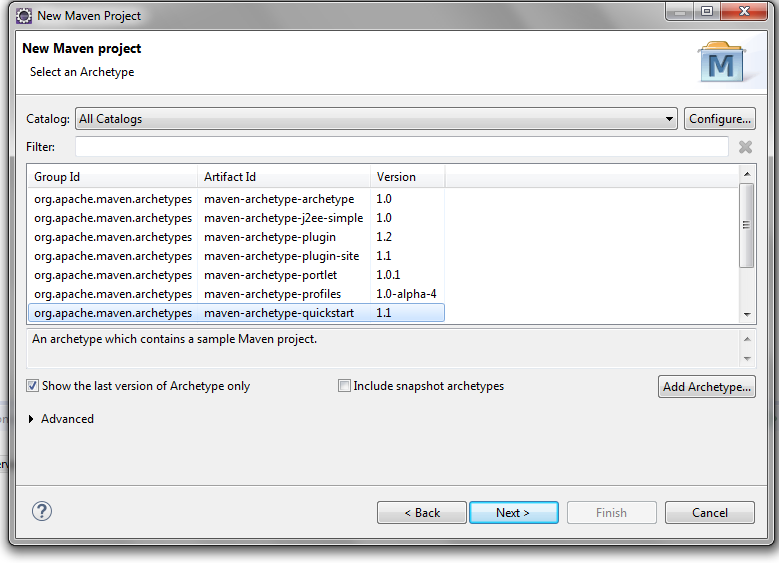
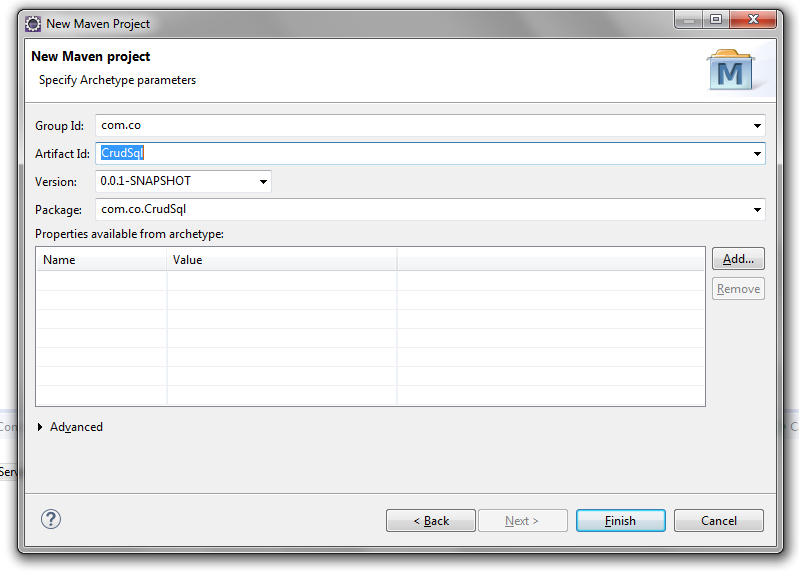
1. We create the project
2. We open the pom.xml File and we will edit it like this:
 <project xmlns="http://maven.apache.org/POM/4.0.0" xmlns:xsi="http://www.w3.org/2001/XMLSchema-instance"
  xsi:schemaLocation="http://maven.apache.org/POM/4.0.0 http://maven.apache.org/xsd/maven-4.0.0.xsd">
  <modelVersion>4.0.0</modelVersion>
  <groupId>com.co</groupId>
  <artifactId>CrudSql</artifactId>
  <version>0.0.1-SNAPSHOT</version>
  <packaging>jar</packaging>
  <name>CrudSql</name>
  <url>http://maven.apache.org</url>
  <properties>
       <java-version>1.7</java-version>
       <project.build.sourceEncoding>UTF-8</project.build.sourceEncoding>
      <project.reporting.outputEncoding>UTF-8</project.reporting.outputEncoding>
      <!-- <hibernate.version>4.3.5.Final</hibernate.version> -->
      <hibernate.version>4.3.5.Final</hibernate.version>
      <!-- Logging -->
      <logback.version>1.0.13</logback.version>
      <slf4j.version>1.7.5</slf4j.version>
  </properties>
  <dependencies>
     <!-- http://mvnrepository.com/artifact/org.springframework/spring-context-support -->
     <dependency>
       <groupId>org.springframework</groupId>
       <artifactId>spring-context-support</artifactId>
       <version>4.2.6.RELEASE</version>
     </dependency>
     <dependency>
       <groupId>org.springframework</groupId>
       <artifactId>spring-orm</artifactId>
       <version>4.2.6.RELEASE</version>
     </dependency>
     <dependency>
       <groupId>org.springframework</groupId>
       <artifactId>spring-tx</artifactId>
       <version>4.2.6.RELEASE</version>
     </dependency>
     <dependency>
       <groupId>org.springframework</groupId>
       <artifactId>spring-web</artifactId>
       <version>4.2.6.RELEASE</version>
     </dependency>
     <dependency>
       <groupId>commons-dbcp</groupId>
       <artifactId>commons-dbcp</artifactId>
       <version>1.4</version>
     </dependency>
     <dependency>
       <groupId>org.hibernate</groupId>
       <artifactId>hibernate-core</artifactId>
       <version>4.1.0.Final</version>
     </dependency>
     <dependency>
       <groupId>org.hibernate.javax.persistence</groupId>
       <artifactId>hibernate-jpa-2.0-api</artifactId>
       <version>1.0.0.Final</version>
     </dependency>
     <!-- https://mvnrepository.com/artifact/com.microsoft.sqlserver/sqljdbc4 -->
            <dependency>
             <groupId>com.microsoft.sqlserver</groupId>
             <artifactId>sqljdbc4</artifactId>
             <version>4.0</version>
            </dependency>
            <dependency>
       <groupId>mysql</groupId>
       <artifactId>mysql-connector-java</artifactId>
       <version>5.1.36</version>
     </dependency>
     <!-- SQLite JDBC library -->
           <dependency>
       <groupId>org.xerial</groupId>
       <artifactId>sqlite-jdbc</artifactId>
       <version>3.7.2</version>
     </dependency>
           <dependency>
             <groupId>net.kemitix</groupId>
             <artifactId>sqlite-dialect</artifactId>
             <version>0.1.0</version>
           </dependency>
           <!-- SQLite JDBC library Ends-->
  </dependencies>
 </project>
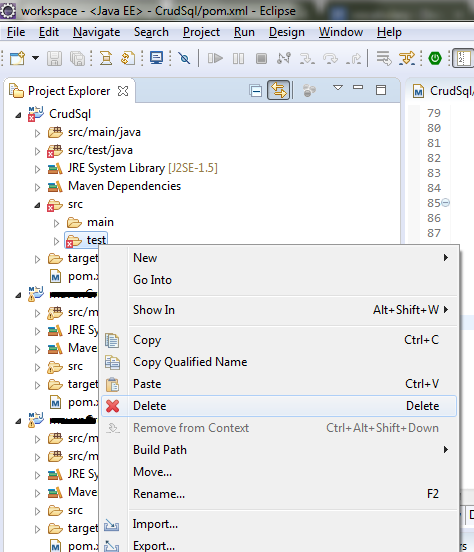
3. We delete the test folder
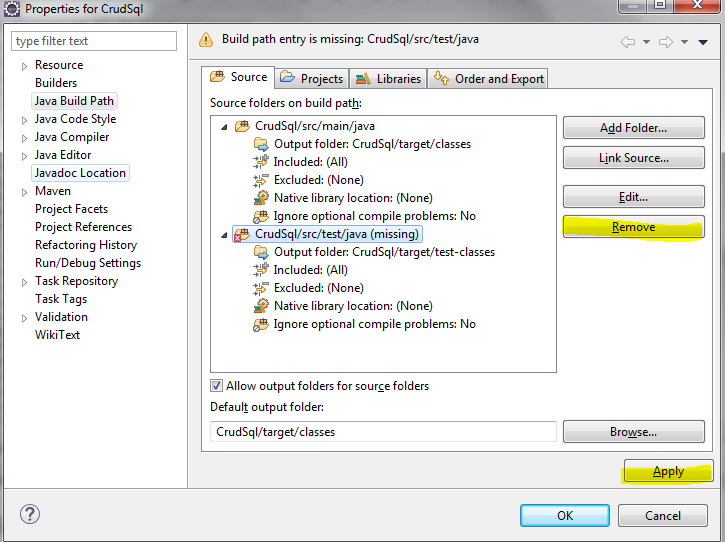
4. We press right click on project -> properties -> Java Build Path, we select the test project, we press the remove button and apply button
5. Now we create the structure of the project
6. First we create the entities.
 import javax.persistence.Table;
 @Entity
 @Table(name="Users")/*name of table*/
 public class User {
      @Id
      @Column(name="id")/*name of column in the database*/
      @GeneratedValue(strategy=GenerationType.IDENTITY)/*The id is autoincrement*/
      private int id;
      @Column(name="name")/*name of column in the database*/
      private String name;
      @Column(name="email")/*name of column in the database*/
      private String email;
      public int getId() {
           return id;
      }
      public void setId(int id) {
           this.id = id;
      }
      public String getName() {
           return name;
      }
      public void setName(String name) {
           this.name = name;
      }
      public String getEmail() {
           return email;
      }
      public void setEmail(String email) {
           this.email = email;
      }
 }
7. Now we create the dao, we start with the interface and later we create the implement.
 package com.co.CrudSql.dao;
 import com.co.CrudSql.entities.User;
 public interface UserDao {
      public void save(User user);
      public void update(User user);
      public void delete(User user);
 }
 package com.co.CrudSql.daoImp;
 import org.hibernate.Session;
 import org.hibernate.SessionFactory;
 import org.hibernate.Transaction;
 import com.co.CrudSql.dao.UserDao;
 import com.co.CrudSql.entities.User;
 public class UserDaoImpl implements UserDao{
      private SessionFactory sessionFactory;
      public void setSessionFactory(SessionFactory sessionFactory) {
     this.sessionFactory = sessionFactory;
   }
      public void save(User user) {
           Session session = this.sessionFactory.openSession();
           Transaction tx = session.beginTransaction();
           session.persist(user);
           tx.commit();
           session.close();
      }
      public void update(User user) {
           Session session = this.sessionFactory.openSession();
           Transaction tx = session.beginTransaction();
           session.update(user);
           tx.commit();
           session.close();
      }
      public void delete(User user) {
           Session session = this.sessionFactory.openSession();
           Transaction tx = session.beginTransaction();
           session.delete(user);
           tx.commit();
           session.close();
      }
 }
8. We create the services interface and the services implement
 package com.co.CrudSql.services;
 import com.co.CrudSql.entities.User;
 public interface UserServices {
      public void saveUser(User user) throws Exception;
      public void updateUser(User user) throws Exception;
      public void deleteUser(User user) throws Exception;
      public void closeContext() throws Exception;
 }
In the constructor we can choose the database that we will use
 package com.co.CrudSql.servicesImpl;
 import org.springframework.context.support.ClassPathXmlApplicationContext;
 import com.co.CrudSql.dao.UserDao;
 import com.co.CrudSql.entities.User;
 import com.co.CrudSql.services.UserServices;
 public class UserServicesImpl implements UserServices{
      ClassPathXmlApplicationContext context;
      UserDao userDao;
      public UserServicesImpl(String tipoDb) {
           super();
           if("sqlServer".equalsIgnoreCase(tipoDb)){
                this.context = new ClassPathXmlApplicationContext("spring-sqlserver.xml");
           }
           else if("sqlite".equalsIgnoreCase(tipoDb)){
                this.context = new ClassPathXmlApplicationContext("spring-Sqlite.xml");
           }
           else if("mysql".equalsIgnoreCase(tipoDb)){
                this.context = new ClassPathXmlApplicationContext("spring-Mysql.xml");
           }
           userDao = context.getBean(UserDao.class);
      }
      public void saveUser(User user) throws Exception {
           this.userDao.save(user);
      }
      public void updateUser(User user) throws Exception {
           this.userDao.update(user);
      }
      public void deleteUser(User user) throws Exception {
           this.userDao.delete(user);
      }
      public void closeContext() throws Exception {
    context.close();
 }
 }
9. Now we create a folder called resources, then, we press again right click on project -> properties -> Java Build Path, we choose AddFolder and select the main folder -> click on Create New Folder -> write the name of folder, its name will be resources, we click in finish
In the resources folder we create a xml file that we'll call spring-sqlserver.xml, but you can call it with other name, in this file we'll write the database configuration
 <?xml version="1.0" encoding="UTF-8"?>
 <beans xmlns="http://www.springframework.org/schema/beans"
      xmlns:xsi="http://www.w3.org/2001/XMLSchema-instance" xmlns:aop="http://www.springframework.org/schema/aop"
      xmlns:tx="http://www.springframework.org/schema/tx"
      xsi:schemaLocation="http://www.springframework.org/schema/beans http://www.springframework.org/schema/beans/spring-beans.xsd
           http://www.springframework.org/schema/aop http://www.springframework.org/schema/aop/spring-aop-4.0.xsd
           http://www.springframework.org/schema/tx http://www.springframework.org/schema/tx/spring-tx-4.0.xsd">
      <bean id="dataSource" class="org.apache.commons.dbcp.BasicDataSource"
           destroy-method="close">
           <property name="driverClassName" value="com.microsoft.sqlserver.jdbc.SQLServerDriver" />
           <property name="url" value="jdbc:sqlserver://localhost:1433;databaseName=testDB" />
           <property name="username" value="sa" />
           <property name="password" value="MyPassword" />
      </bean>
      <!-- Hibernate 4 SessionFactory Bean definition -->
      <bean id="hibernate4AnnotatedSessionFactory"
           class="org.springframework.orm.hibernate4.LocalSessionFactoryBean">
           <property name="dataSource" ref="dataSource" />
           <property name="annotatedClasses">
                <list>
                     <value>com.co.CrudSql.entities.User</value>
                     <!-- If we have more entities we can configurate here for example
                     <value>com.co.CrudSql.entities.Country</value>
                     <value>com.co.CrudSql.entities.Car</value>
                     -->
                </list>
           </property>
           <property name="hibernateProperties">
                <props>
                     <prop key="hibernate.dialect">org.hibernate.dialect.SQLServerDialect</prop>
                     <prop key="hibernate.current_session_context_class">thread</prop>
                     <prop key="hibernate.show_sql">false</prop>
                </props>
           </property>
      </bean>
      <bean id="UserDao" class="com.co.CrudSql.daoImp.UserDaoImpl">
           <property name="sessionFactory" ref="hibernate4AnnotatedSessionFactory" />
      </bean>
      <!-- If we have more dao we can configurate here for example
           <bean id="CountryDao" class="com.co.CrudSql.daoImp.CountryDaoIml">
                <property name="sessionFactory" ref="hibernate4AnnotatedSessionFactory" />
           </bean>
           <bean id="CarDao" class="com.co.CrudSql.daoImp.CarDaoImpl">
                <property name="sessionFactory" ref="hibernate4AnnotatedSessionFactory" />
           </bean>
      -->
 </beans>
We make the same with the others configurations for mysql and sqlite
spring-Mysql.xml:
 <?xml version="1.0" encoding="UTF-8"?>
 <beans xmlns="http://www.springframework.org/schema/beans"
      xmlns:xsi="http://www.w3.org/2001/XMLSchema-instance" xmlns:aop="http://www.springframework.org/schema/aop"
      xmlns:tx="http://www.springframework.org/schema/tx"
      xsi:schemaLocation="http://www.springframework.org/schema/beans http://www.springframework.org/schema/beans/spring-beans.xsd
           http://www.springframework.org/schema/aop http://www.springframework.org/schema/aop/spring-aop-4.0.xsd
           http://www.springframework.org/schema/tx http://www.springframework.org/schema/tx/spring-tx-4.0.xsd">
      <bean id="dataSource" class="org.apache.commons.dbcp.BasicDataSource"
           destroy-method="close">
           <property name="driverClassName" value="com.mysql.jdbc.Driver" />
           <property name="url" value="jdbc:mysql://localhost:3306/testDB" />
           <property name="username" value="root" />
           <property name="password" value="MyPassword" />
      </bean>
 <!-- Hibernate 4 SessionFactory Bean definition -->
      <bean id="hibernate4AnnotatedSessionFactory"
           class="org.springframework.orm.hibernate4.LocalSessionFactoryBean">
           <property name="dataSource" ref="dataSource" />
           <property name="annotatedClasses">
                <list>
                     <value>com.co.CrudSql.entities.User</value>
                     <!-- If we have more entities we can configurate here for example
                     <value>com.co.CrudSql.entities.Country</value>
                     <value>com.co.CrudSql.entities.Car</value>
                     -->
                </list>
           </property>
           <property name="hibernateProperties">
                <props>
                     <prop key="hibernate.dialect">org.hibernate.dialect.MySQLDialect</prop>
                     <prop key="hibernate.current_session_context_class">thread</prop>
                     <prop key="hibernate.show_sql">false</prop>
                </props>
           </property>
      </bean>
      <bean id="UserDao" class="com.co.CrudSql.daoImp.UserDaoImpl">
           <property name="sessionFactory" ref="hibernate4AnnotatedSessionFactory" />
      </bean>
      <!-- If we have more dao we can configurate here for example
           <bean id="CountryDao" class="com.co.CrudSql.daoImp.CountryDaoIml">
                <property name="sessionFactory" ref="hibernate4AnnotatedSessionFactory" />
           </bean>
           <bean id="CarDao" class="com.co.CrudSql.daoImp.CarDaoImpl">
                <property name="sessionFactory" ref="hibernate4AnnotatedSessionFactory" />
           </bean>
      -->
 </beans>
spring-Sqlite.xml: i have the testDB.sqlite in D:\Spring\DB
 <?xml version="1.0" encoding="UTF-8"?>
 <beans xmlns="http://www.springframework.org/schema/beans"
      xmlns:xsi="http://www.w3.org/2001/XMLSchema-instance" xmlns:aop="http://www.springframework.org/schema/aop"
      xmlns:tx="http://www.springframework.org/schema/tx"
      xsi:schemaLocation="http://www.springframework.org/schema/beans http://www.springframework.org/schema/beans/spring-beans.xsd
           http://www.springframework.org/schema/aop http://www.springframework.org/schema/aop/spring-aop-4.0.xsd
           http://www.springframework.org/schema/tx http://www.springframework.org/schema/tx/spring-tx-4.0.xsd">
      <bean id="dataSource" class="org.apache.commons.dbcp.BasicDataSource"
           destroy-method="close">
           <property name="driverClassName" value="org.sqlite.JDBC" />
           <property name="url" value="jdbc:sqlite:D:\\Spring\\DB\\testDB.sqlite" />
           <property name="username" value="" />
           <property name="password" value="" />
      </bean>
 <!-- Hibernate 4 SessionFactory Bean definition -->
      <bean id="hibernate4AnnotatedSessionFactory"
           class="org.springframework.orm.hibernate4.LocalSessionFactoryBean">
           <property name="dataSource" ref="dataSource" />
           <property name="annotatedClasses">
                <list>
                     <value>com.co.CrudSql.entities.User</value>
                     <!-- If we have more entities we can configurate here for example
                     <value>com.co.CrudSql.entities.Country</value>
                     <value>com.co.CrudSql.entities.Car</value>
                     -->
                </list>
           </property>
           <property name="hibernateProperties">
                <props>
                     <prop key="hibernate.dialect">org.hibernate.dialect.SQLiteDialect</prop>
                     <prop key="hibernate.current_session_context_class">thread</prop>
                     <prop key="hibernate.show_sql">false</prop>
                </props>
           </property>
      </bean>
      <bean id="UserDao" class="com.co.CrudSql.daoImp.UserDaoImpl">
           <property name="sessionFactory" ref="hibernate4AnnotatedSessionFactory" />
      </bean>
      <!-- If we have more dao we can configurate here for example
           <bean id="CountryDao" class="com.co.CrudSql.daoImp.CountryDaoIml">
                <property name="sessionFactory" ref="hibernate4AnnotatedSessionFactory" />
           </bean>
           <bean id="CarDao" class="com.co.CrudSql.daoImp.CarDaoImpl">
                <property name="sessionFactory" ref="hibernate4AnnotatedSessionFactory" />
           </bean>
      -->
 </beans>
10. Finally we create the code for save an user data in the main class, we could delete or update user here if we wish, only we must call the functions.
 package com.co.CrudSql;
 import com.co.CrudSql.entities.User;
 import com.co.CrudSql.services.UserServices;
 import com.co.CrudSql.servicesImpl.UserServicesImpl;
 public class App
 {
   public static void main( String[] args ) throws Exception
   {
     UserServices userServicesSqlServer = null;
     UserServices userServicesMysql = null;
     UserServices userServicesSqlite = null;
        try {
          User user = new User();

          userServicesSqlServer = new UserServicesImpl("sqlServer");
          user.setName("My name");
          user.setEmail("myname@myname.com");
          userServicesSqlServer.saveUser(user);

          userServicesMysql = new UserServicesImpl("mysql");
          user = new User();
          user.setName("My name");
          user.setEmail("myname@myname.com");
          userServicesMysql.saveUser(user);

          userServicesSqlite = new UserServicesImpl("sqlite");
          user = new User();
          user.setName("My name");
          user.setEmail("myname@myname.com");
          userServicesSqlite.saveUser(user);

           } catch (Exception e) {
                e.printStackTrace();
           }finally {
                userServicesSqlServer.closeContext();
                userServicesMysql.closeContext();
                userServicesSqlite.closeContext();
           }
   }
 }